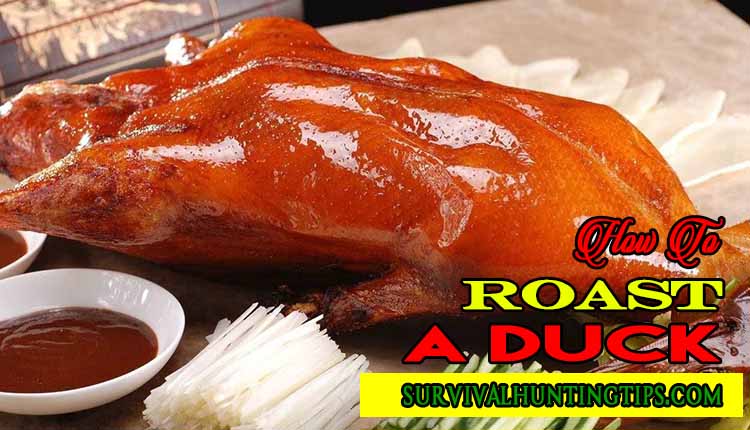
Finally, you are in the right place to learn – How To Roast A Duck at your home? I know you are searching for your answers on the web. But now you don’t have to go anywhere else. I promise you that after reading this post, all your doubts related to duck roasting will be cleared for sure.
Duck meat is good for health as it is a red meat which contains the highest amount of iron than any other poultry. It also has essential nutrients which include protein, phosphorus, zinc, riboflavin, niacin, vitamin B-6, and B-12, thiamine, and magnesium. Not only healthy but it tastes good also and especially a roasted duck.
Table of Contents
Okay, Okay… So, Tell Me, How To Roast A Duck?
It’s not that hard you are thinking but pretty simple and even to roast a duck you don’t need to be a chef or professional. You can do it perfectly at your home but it takes time and requires a complete observation.
But, Wait… What Did I Need To Roast My Duck?
It requires fewer ingredients and equipment that are as follows:
Equipment required
- An oven
- Skewers to flip it
Ingredients required
- 1 Whole duck with removed giblets and defrosted(if frozen)
- One tbsp Kosher salt
- 1 and 1/2 tbsp freshly ground Black pepper
Optional Ingredients to make it more amazing
That’s what I used in mine
- 1 orange, cut into quarters
- One head of garlic, peel removed and top trimmed
- 1 tbsp paprika
Ingredients to make a spicy glaze for it
- 1/4 cup honey
- 1/4 cup molasses
- 3 tbsp orange juice
- 1 tbsp soy sauce
- 1 tbsp chili sauce
How To Defrost A Frozen Duck?
The process of defrosting is called thawing. In this process, the frozen meat left for some time in a cool place until its icy solidness is gone.
To defrost your duck just put the frozen duck into the refrigerator in a bowl. After every 5-6 hours drain the water melted in the bowl and put it again in the refrigerator. Repeat this process until the duck meat loses its solidness completely and becomes soft. After this, just boil it for 10 minutes.
The whole process of duck roasting involves removing oil and we must aim
to burn every single fat in its skin by flipping it again and again. That’s what we called duck roasting.
Why Removing Oil Is Necessary And Why Should We Waste It?
It is necessary to remove oil from its skin to give it a nice and crisp texture. Along with crispiness, it gives the whole duck an amazing flavor and tenderness.
This removed oil is not wasted, as it will get stored in the tray below while heating it in the oven. This oil is very similar to olive oil and you can use this oil in your favorite recipes. Like, I love to have it with mashed potatoes and bread toast.
Now I am going to break the full process of duck roasting four into simple steps. So, that you can understand it better
Step 1: Getting The Duck, Ready To Roast
First, we need to remove all the excess skin from the bottom cavity but remember, just remove the excess skin only. After that, just make some cuts and pokes on the whole duck body. This will helps the oil to come out easily.
But don’t make these cuts and pokes unevenly. While doing all this, make sure that it will look good when served. Just take your time and make some criss-cross diamond shapes with a knife on the breast part and poke the rest of the body with a skewer while maintaining the same length between them.
Step 2: Marinating Our Bird
After, you poked your bird, LOL… It needs to be marinated so that, it can absorb the flavors of spices. You can follow the traditional method(Salt and lemon juice) of marinating meat. If you want but, my marinating technique is quite different from other because I use rosemary and thyme to remove bad smell of meat and to give it some fresh herby flavor.
If you want to use this, just put some fresh sprigs of rosemary and thyme along with some salt in the bottom cavity of the duck and then fold the skin to seal it and shake it. So that, the mixture will be sprinkled inside the body. After that, just put it in the refrigerator for 2 to 3 days.
Note: You can also leave it overnight if you don’t have time.
Step 3: It’s The Time To Roast
After marinating your duck here comes the real process but before we start I must tell you that roasting duck needs a complete supervision and you need to flip it many times after regular intervals. Ready? Let’s begin
First, pre-heat the oven at 300 degrees
Now, just mix the black pepper and paprika together, sprinkle this mixture inside and outside the duck and put the pieces of orange and the head of garlic into the cavity. Then, cross the legs and tie them together.
Note: If you have garlic allergy don’t use it.
After all the spicing and filling,
- Put it in the oven with the breast side up for an hour.
- After one hour, take it out, remove the oil from the tray below and flip it and again roast it with breast side down.
- After one hour, take it out, remove the oil from the tray below and flip it and again roast it with breast side up.
- Remove the oil from the tray below and flip it and again roast it with breast side down.
After these above steps, increase oven temperature to 400 degrees and roast the duck again for 10 minutes with breast side up.
Step 4: Glazing It To Add Some Extra Flavors
To make the glaze for it just mix 1/4 cup of honey, 1/4 cup of molasses, 3 tbsp orange juice, 1 tbsp soy sauce and 1 tbsp chili sauce together and the glaze is ready.
Now, just brush the glaze all over the roasted duck and again put it in a 400-degree pre-heated oven for 5 to 10 minutes.
Warning: Please wear safety gloves and do care while dealing with the hot oven and duck and don’t hurry.
Now, your duck is ready for the party, Quack! Quack!…
Thank’s for reading and I hope you enjoyed this article and learned a lot from it. And now, don’t ask again – How To Roast A Duck? I am pretty sure that now you will be able to roast a duck on your own. If you have any suggestion with duck roasting… Please! share with us in the comment section below.
HAPPY ROASTING — SAFE ROASTING
Reference
- https://www.thehungrymouse.com/2009/02/11/the-best-way-to-roast-a-duck-hello-crispy-skin/
- https://www.bbc.com/food/techniques/how_to_roast_a_duck
- https://healthyeating.sfgate.com/duck-meat-cholesterol-2410.html
- https://www.ehow.com/how_8148468_defrost-duck.html